
The Joys of Coloured Clay!

A while ago, I read a magazine on ceramics and came upon the most beautiful pictures of ceramic ware made of coloured clay. I googled it and was amazed to see the possibilities of coloured clay. It is called Nerikomi: the art of colouring clay and forming coloured blocks – often used in Japanese pottery. The Nerikomi pattern slices go all the way through the walls of, for instance, a bowl. 

So the patterns can be seen at both sides of the bowl. You can create the most amazing things and get fantastic combinations. I was immediately curious and decided to give it a try.

I decided to start with bowls and platters. I thought it would be wise to get to grips with the process of how to make coloured clay first and set off creating some simple shapes.

I decided to use porcelain clay because the colours will show well combined with white clay and started with five colours: bright red, lime green, yellow, darker purple-blue and a lighter blue. To mix the colours, I used coloured stains.
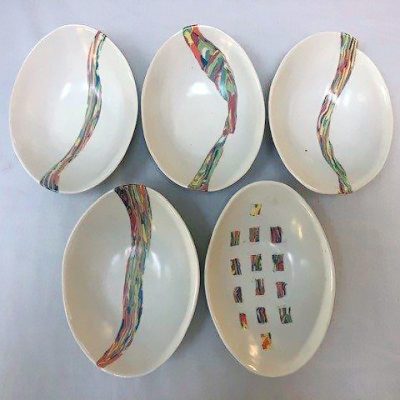
Coloured clay; ceramics

Making the Coloured Clay

  • Weigh out five balls of 100g porcelain clay and formed them into small pinch pots. Add about 8g of the coloured stains into each pinch bowl, add a bit of water to form a smooth paste. Continue to mix and blend the colour into the porcelain until it forms one solid colour. I used a wooden tool at the beginning to mix it. Using your fingers can dry out the clay and, the colour also sticks to your hands. Once you made the coloured clay balls, store them in an air-tight plastic bag and let them rest for a while so that all the stains get time to dissolve into the clay. When done, wedge them properly to make sure you get even solid colours.
  • The next step is to break each ball of coloured clay into smaller pieces and roll out multiple thin slabs.
  • Then start the layering of the different coloured clay slabs. One slab of coloured clay is placed firmly on top of another coloured slab. You can also cut the slabs into smaller pieces and make a layer existing of multiple, coloured clays.
  • I also cut thin, long slabs and placed them across the slabs. That way you will get many interesting colour variations. You can also roll out thin coils and arrange them in various patterns on top of different slabs.
  • Avoid trapping air bubbles by pressing with your fingertips into the grooves. Continue playing like this to create several diverse designs of layered clay. Now all the different layers are put on top of each other to form a Nerikomi sandwich. Shape the Nerikomi sandwich by slapping, stretching and compressing it.
  • To find a step by step guide, with pictures, of working with coloured clay follow this link